.png)
(1) Preparations Before Starting the Equipment:
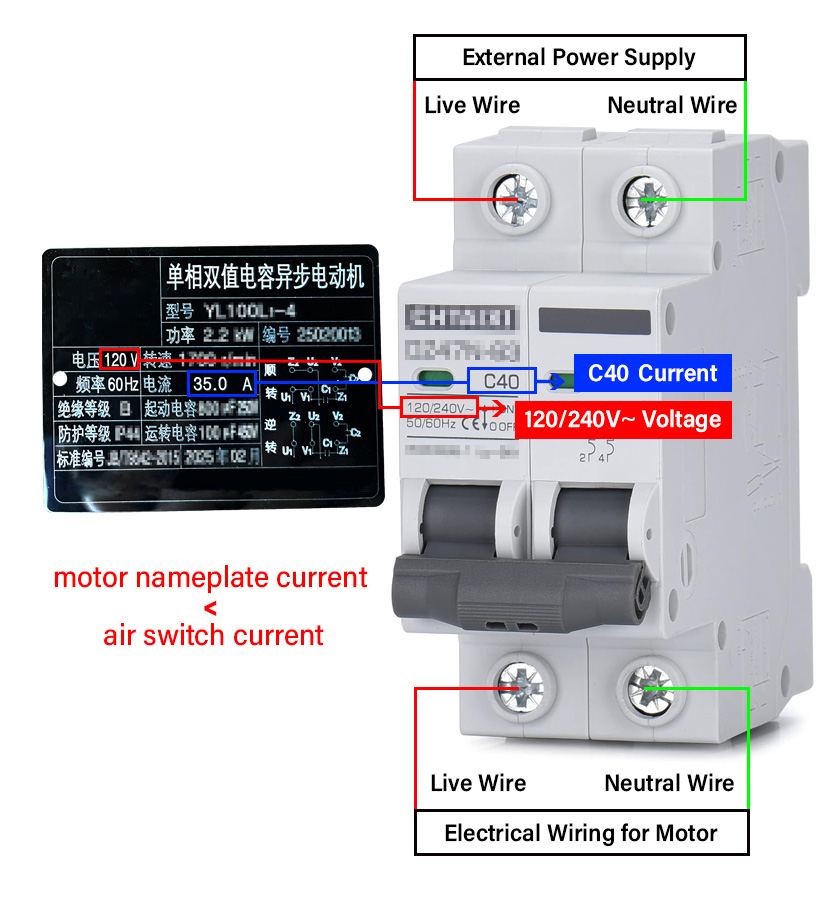
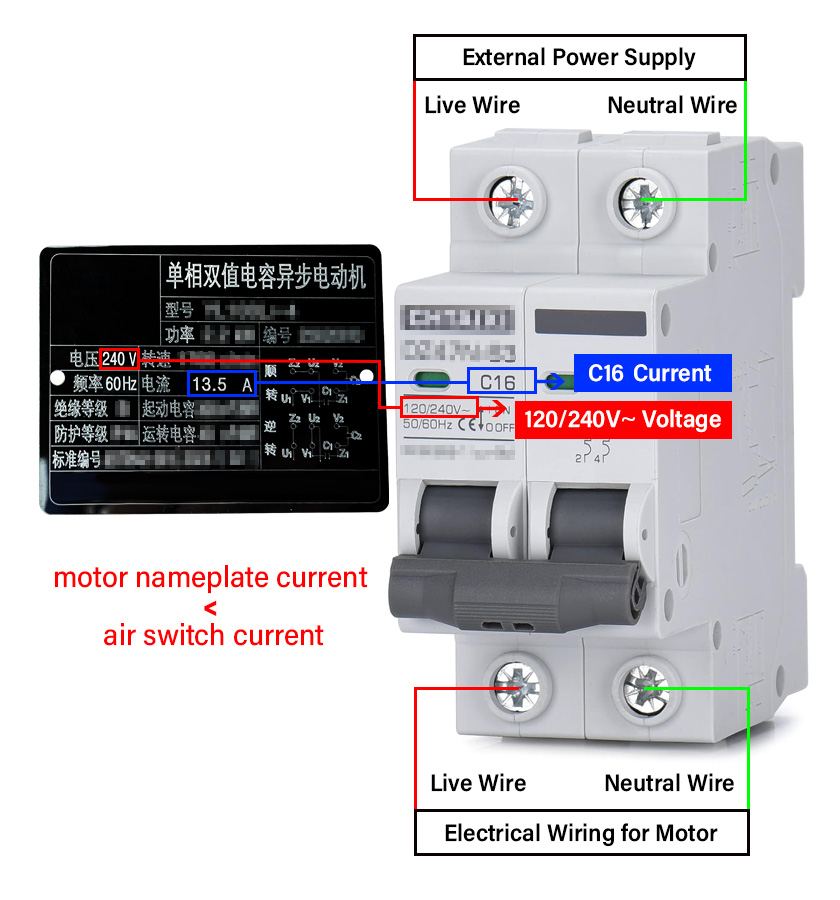
① Install the air switch and connect the wires.
② How to choose the air switch.
③ How to install the air switch.
④ How to connect the wires.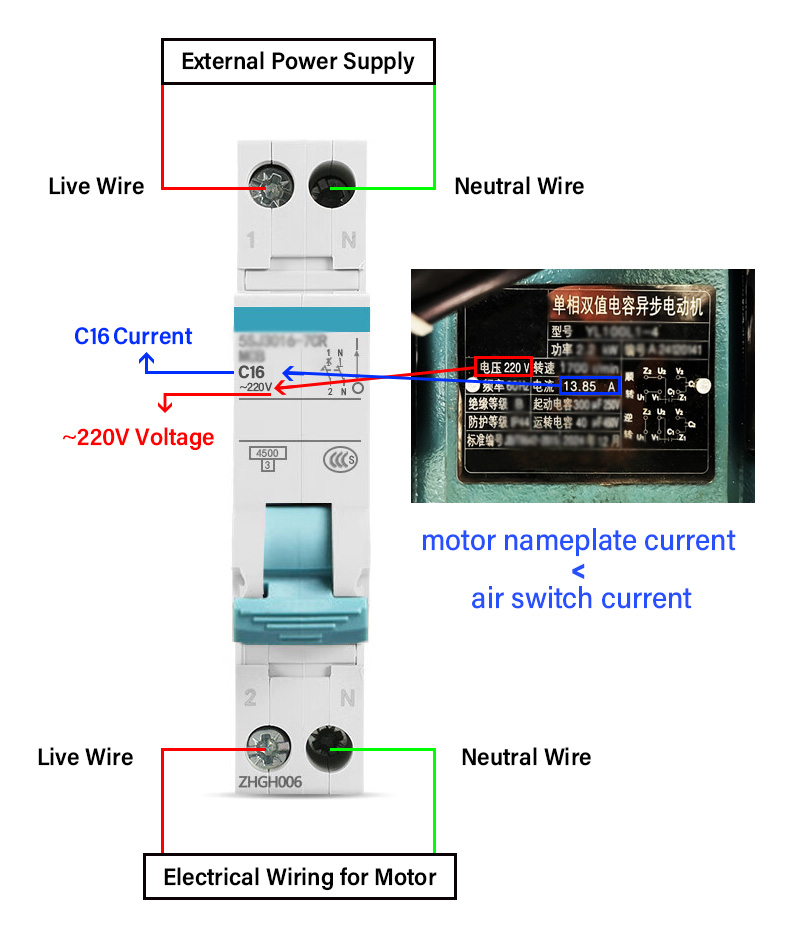
Power Connection & Rotation Check
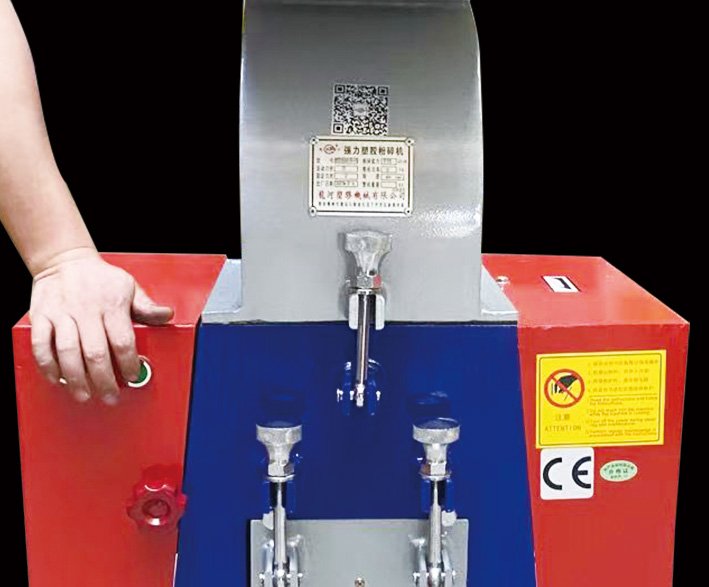
Step 1: Power On
After connecting the power cable, press the green button to start the machine.
Wait for about 30 seconds and listen carefully.
If you hear any unusual noise, stop immediately.
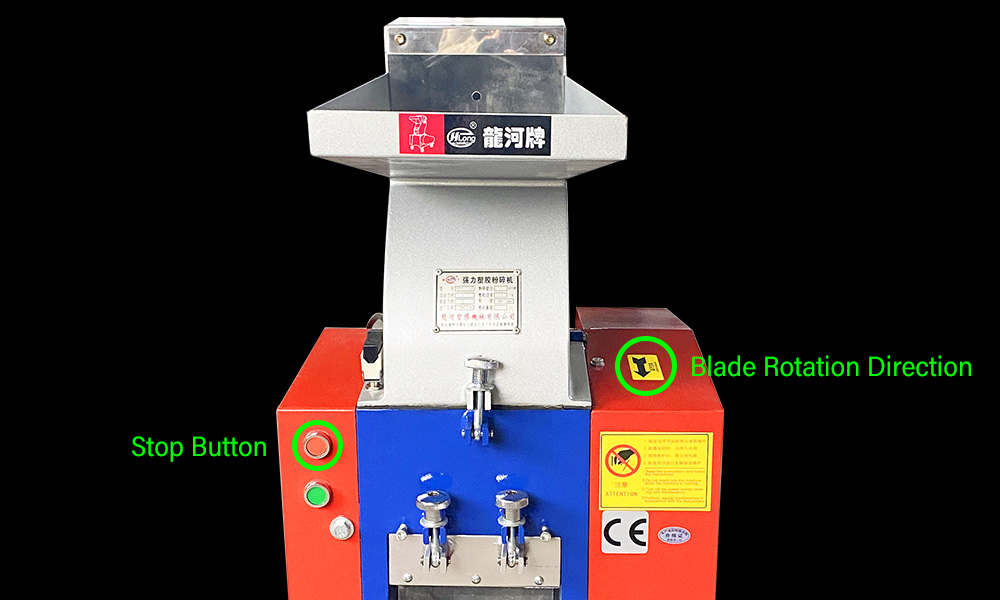
Step 2: Stop & Check Rotation
Press the red button to stop the machine.
Open the left-side safety cover and check the blade rotation direction.
The correct direction should match the arrow on the right side of the machine.
Step 3: Confirm & Operate Normally
If the rotation direction is correct, close the safety cover securely.
Press the green button again to restart.
You may now begin feeding the material into the machine for normal operation.
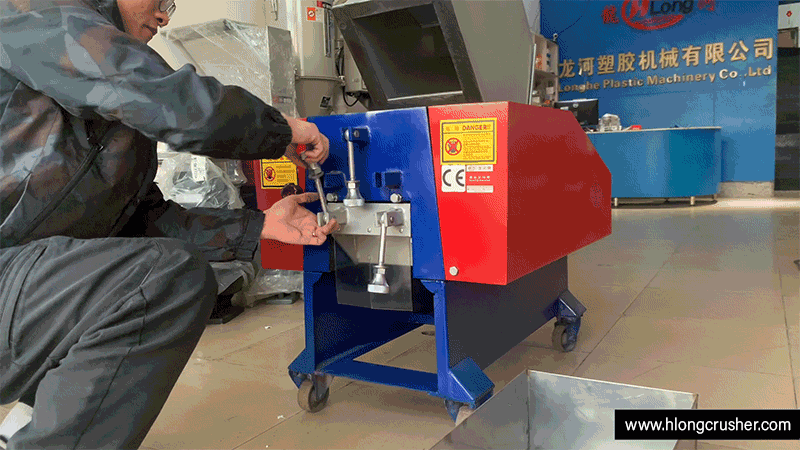
A step-by-step tutorial for replacing the screen
Step-by-Step Guide to Replacing Cutters
Step 1:
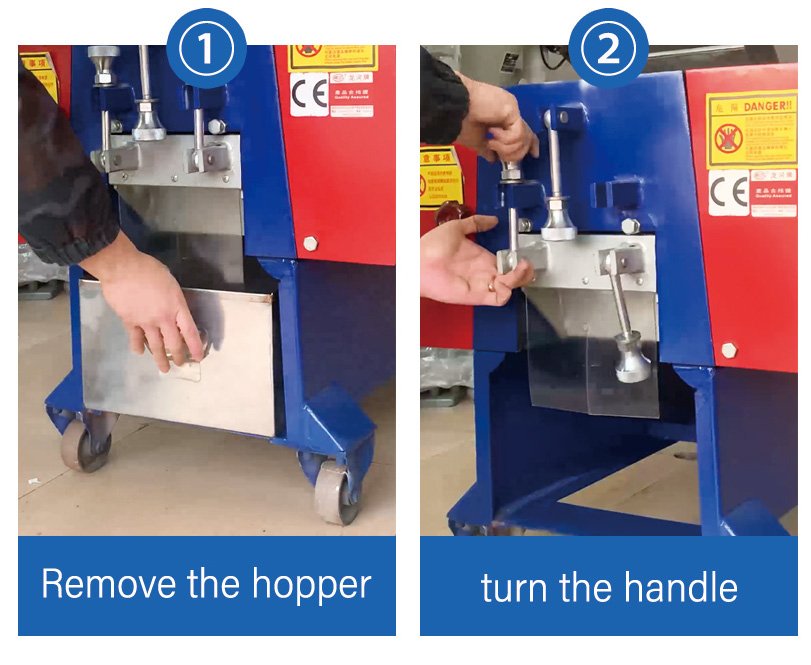
Disconnect the power supply and open the feeding port to ensure safe operation.
Step 2:
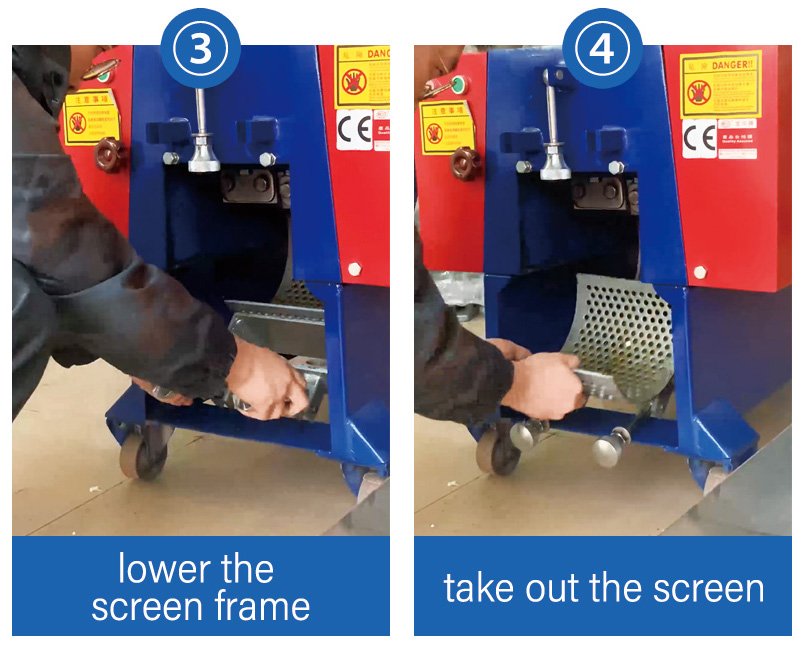
Lower the screen frame to access the crushing chamber.

Step 3:
Open the protective cover on the right side of the machine body.

Step 4:
Manually rotate the balancing wheel to help discharge any residual material.
This action rotates the cutter holder, allowing thorough clearance of material inside the chamber.

Step 5:
Remove the fixed cutters at the front and rear of the machine body.Use theproper tools to unscrew the cutter-locking bolts and disassemble both the front and rear fixed cutters

On older machine models, the motor and rear cover plate may need to be removed before accessing the rear fixed cutter.
Step 6:
Remove the movable cutters from the cutter holder. If any screw is stuck due to wear (e.g., stripped threads), apply lubricating oil to loosen it.
Promptly replace any worn cutters to prevent them from falling off during operation.
Step 7:
Clean the crushing chamber thoroughly using a brush or air gun to remove all debris and dust.
This step is essential: improper cleaning may result in misalignment during reassembly and affect machine performance.
Installation Process
Step 8:
Install the front fixed cutter first.Make sure the side with the logo faces forward.
The cutting edge should face inward, and the back of the cutter should face upward.
Secure the cutter loosely using the locking screws, then adjust the blade’s front-to-back distance by fine-tuning the screw length.

Step 9: Install the movable cutters.
For fabric crusher:
Install the left movable cutter first, then rotate the balancing wheel to check spacing.
Adjust the cutter position carefully, ensuring the correct edge distance.

Again, do not move the front fixed cutter during this step.
For glass crusher: Start with the left and right movable cutters on the same plane.
Rotate the cutter holder to observe the distance between the movable edges and the front fixed cutter.
Adjust the fixed-cutter screws to fine-tune the spacing. Rotate continuously while adjusting to ensure both movable cutters are aligned. Tighten all screws once the position is correct.

Do not move the front fixed cutter during this process.
Smaller cutting edge gaps result in better performance — this has nothing to do with material thickness.
The blades should be as close as possible without touching.
Some operators mistakenly believe that thicker materials require a larger gap — this is incorrect.
Step 10:
Install the rear fixed cutter. The logo side faces forward, with the cutting edge inward and the front side upward.
Secure it with locking screws, then adjust the blade’s position front-to-back by regulating screw length.
Rotate the balancing wheel to confirm that the left and right movable cutters pass smoothly with proper clearance.
Tighten the rear fixed cutter once aligned.

Step 11:
Install all remaining movable cutters one by one.
After each installation, rotate the balancing wheel to ensure all movable blades pass smoothly between the fixed cutters.
Do not alter the positions of the front or rear fixed cutters during this process.
Step 12:
Tighten all cutter screws again to ensure they are secure and free of looseness.
Finally, rotate the balancing wheel once more to double-check blade clearance and smooth operation.
Step 13:
Close the screen frame and shut the feeding port to complete the process.
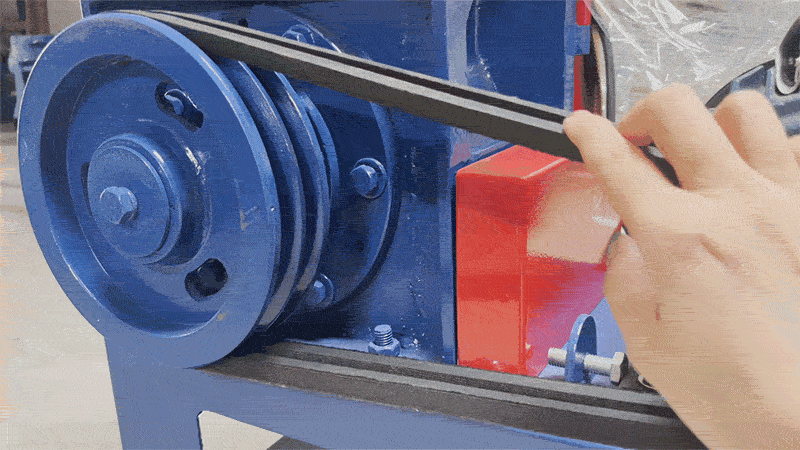
① Power off the machine.
② Press the belt by hand. If it feels tight and firm, replacement is not needed.
③ If it feels loose or slack, adjust the distance between the motor and machine body until the belt is properly tightened.
④ If the belt surface is badly worn, it should be replaced.
① Remove the right-side protective cover. Hold the front wheel with one hand, and use a long rod with the other hand to pry and rotate the front wheel at the same time.

② Install the new belt. First, place one end on the rear wheel, then guide the other end onto the front wheel while rotating it.
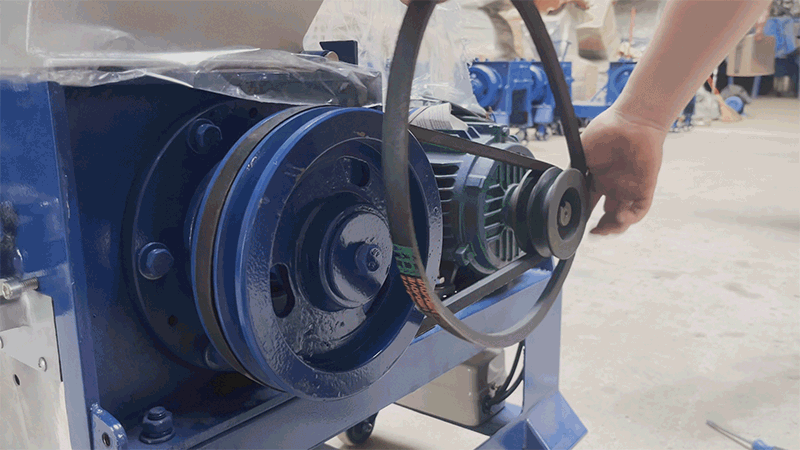
③ Stand in front of the machine and check alignment:
The belt should be in a straight line
If using multiple belts, make sure they are parallel
Rotate the front wheel to check for proper tension
① After 1,440 hours of use, check whether the cutter holder rotates smoothly.
② If not, lubrication is needed.
③ Remove both left and right protective covers, then add fixed-position lubricant to the points shown in the diagram.
